/ Photography Techniques
1. Manual or Auto Mode
When i purchase my DSLR the first thing i learn was to to set the camera dial to Auto Mode and start clicking the images, no doubt the images were really nice and people also like them, but whenever i visit to any photography website and watch any video i see photographers shooting in Manual modes, i was totally confused about the benefits in manual mode.
So let me share with you what i know today, that i did not know back then


When shooting portrait whether of people or animals, your subject should be the main focus of the picture and the best way to achieve this is to use a wide aperture. This will keep your subject sharp while blurring out any distractions in the background.
Keep in mind that the smaller f/ number means a wide aperture and the wider the aperture the more dramatic this effect will be. Some lens can go as low as f/1.2 but even aperture of f/5.6 can do the best. To better understand how the aperture effects your image, switch to Aperture Priority Mode (Av or A) and try taking some shots with different aperture.
12. Eyes should always be in focus

One major thing in photography is eyes, the eye are an important facial feature and they are often the first thing people look at, specially when it comes to closeup or head shots. With this in mind you subject`s eyes should be your main point of focus. To get both eyes nice and sharp, chose a single focus point and aim it at one of the eye. Once the first eye is in focus keep the shutter button pressed halfway down and move the camera slightly to recompose the photo and include the second eye.
13. Always shoot in Golden Hours

Lighting can make or break the photo, and the early morning and evening are widely thought to be the best time of the day for taking photos. In photography the hours just after the sun rise or before it sets is called the "Golden Hour" because the sun is lower in the sky and the light is softer and warmer. Whether you are shooting landscapes, portraits, or still life, using the early morning or evening light can give your photo a serene feel with its warm glow and a long shadows it casts. Of course the golden hour is not the only time you can get good outdoor photos, but it does make it easier.
14. What is White Balance
Understanding camera white balance is a cornerstone of taking good photo with a digital camera. Poor white balance means a worst, a ruined photo and at last a lots of time wasted post processing your image in an attempt to fix what you could have fixed in camera. Most digital camera have the ability to change the white balance manually,white balance is an algorithm in the camera which tries to understand the current lighting situation and judge the possible light source and then compensate to remove any possible color cast, the color temperature of a light source is measured in Kelvin (K). The color temperature over 5400K are called the warmer color (looks orange), while lower color temperature 27000K to 3500K are called the cooler color (looks blue).
Let us look at the image to understand the color cast effect due to wrong white balance :
 Now what we understand how bad a photograph might look like, so to get rid of this there is a way to overcome with this situation, choosing auto white balance and shooting in RAW mode is the most feasible solution in my opinion. When you are using anything other than auto mode always be very conscious of the white balance setting. You need to remember to change it. The below is the image is the good example of white balance. Here the left and the right image shows the cool and the warm tint as the white balance is not good but the center image white balance is perfect.

With the Nikon D3300 set to Aperture Priority we are able to access the white balance menu from within the the camera setting menu. Here we can select one of the preset white balance option based on our current shooting conditions.

So whatever method you are using don`t forget to review the photograph in LCD monitor and probably correct the white balance right in the field.
15. Depth of Field

Depth of field is a fancy way of describing what is in focus in your photo, is your range of focus is shallow or deep. Here is a simple exercise to explain this concept. Hold your hand up in front of of your face, close one eye and now focus on the details of your hand. Do you notice that once you focus on your hand that everything in the background goes out of focus. Now leave your hand there leave one eye closed and focus on the background. Notice how your hand is out of focus, the term depth of field is simply the art of controlling how much of your photo is in focus.

A shallow depth of field is preferable because it enables you to blur background and foreground details causing distraction to melt away and allowing you to direct viewers to the focal point in a picture. Many digital cameras come with a Depth of Field preview button near the lens mount, or enable you to assign the same function to one of the other buttons. However it dosen`t have any effect on the depth of field. There`s a range of ways to control the depth of field, the choice of aperture, focus distance and the type of camera. In a nutshell, wider aperture and closer focusing distance lead to a shallow Depth of Field.
15. Candid Photography

Taking photos of peoples when they have no idea that you are doing is called Candid Photography, One of the beauties of this photography is being able to catch someone in the act. It ads life to your images.
Although taking a candid shot can seems easy, i am going to give you a few steps to follow that will help you to magnify the effectiveness and quality of your image.

Candid Photography is all about understanding and capture unplanned moments of someone`s emotions, either they are tears or happiness. The skill you have to develop as a photographer is the ability to take notice and observe. Photographer will look far and wide, over the crowd and through the landscape looking for that one in a million shot.
Taking Candid photos can be fun and exciting and one of the most rewarding of all photos but the downside is it can become annoying when the subject is aware of the camera.
When i purchase my DSLR the first thing i learn was to to set the camera dial to Auto Mode and start clicking the images, no doubt the images were really nice and people also like them, but whenever i visit to any photography website and watch any video i see photographers shooting in Manual modes, i was totally confused about the benefits in manual mode.
So let me share with you what i know today, that i did not know back then
- When you control the manual settings, you get full control over your camera and images. This is when you can get really creative and this can not be done in auto mode.
- When you have the full control over your camera, you save time in photo editing software like photoshop, Light Room etc. Because your photo will be very close to perfect right out of the camera all you need is to fine adjust a few things and that`s all.
- By knowing the camera setting in depth you can play with the lighting conditions, instead of being frustrated. You can do great things in manual mode.
- Manual Mode : This mode puts you in full control of the three settings on your camera that controls the exposure (Commonly known as Exposure Triangle). ISO, Aperture and Shutter Speed. In Manual you will be making all of those choices.
- Aperture Priority : This mode has you in control of two of the three exposure controls, ISO and Aperture. The Camera will select an appropriate shutter speed to give you a correct exposure. (A on Nikon and AV on Canon).
- Shutter Priority : This mode once again puts you in control of two of the three exposure settings this time it is ISO and Shutter Speed. The camera will select the aperture for a correct exposure. (S on Nikon and TV on Canon)
Whether you are a beginner or experienced with photography, there are some tips that will benefit you and give you better result. Some common issues that you may have to deal with and some tips on how you can use them to your advantage.
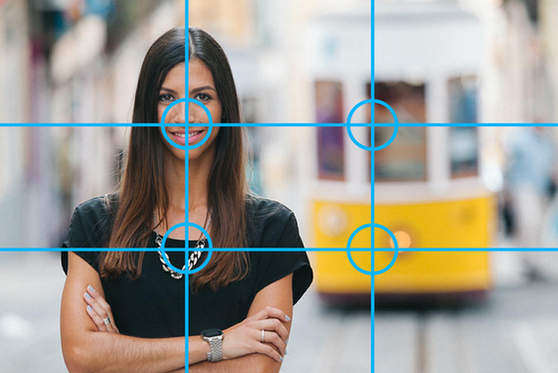
2. Rule of Thirds

To use rule of thirds imagine four lines, two laying horizontally across the image and two vertical creating nine even squares. Some images will look best with the focal point in the center square, but placing the subject off center will often create a more aesthetically composed photograph. When a photograph is composed using the rule of thirds the eyes will wander the frame. A picture composed by the rule of thirds is more interesting and pleasing to the eye.
3. Sunny 16 Rule

The idea with the Sunny 16 rule is that we can use it to predict how to meter our camera on a sunny outdoor day. So when in that situation choose an aperture of f/16 and 1/100th of a second shutter speed (you are using ISO 100). You should have a sharp image that is neither under or over exposed. This rule is useful if you don`t have a functioning light meter or if your camera doesn`t have an LCD screen to review the image.
4. Avoid Camera Shake

Camera shake or blur is very common while doing hand held photography, first you need to learn how to hold your camera properly.
So here`s my best tips for doing that :
- Use your right hand to hold the camera firmly, use your left hand to hold and move the lens.
- Wrap the strap around your right hand for added security and stability.
- When holding the camera to your face make sure your arms and elbow are tucked into your body.
- You need to keep your balance. If you loose your body balance you loose your shot also.
- Breathing plays an important role while pressing the shutter button so either inhale and hold your breath or exhale and hold your breath while pressing the button. Which ever way works for you.
- Use object around you to support yourself with fence, a wall, the ground, a rock or crouch down and use your knee or maybe your arm.
- Don`t get over exited and don`t give the shutter a jerk, squeeze it gently after pressing it half way down to focus.
5. Choose the Right ISO

Choosing the right ISO while taking photos is an another important task you have to follow. But remember one thing the higher ISO the higher noise and the lower ISO the lower noise in your images. I will explain you about the noise later. For your reference the ISO details are as under.
Bright Sun ISO 100
Overcast ISO 200
Deep Shade ISO 400
Indoor on a sunny day ISO 200-640
Indoor on a cloudy day ISO 400-1200
Indoor at night ISO 1600 +
6. Pan to Create Motion

If you want to capture a subject in motion then use the panning techniques, to do this choose the shutter speed around two steps lower than necessary. So for 1/250 we would choose 1/60. Keep the camera on the subject with your finger half way down on the shutter to lock the focus and when ready take the photo. Remembering to follow them as they move. Use a tripod or a monopod if possible to avoid camera shake and get clear movement lines.
7. Fun With Shutter Speed
You can do loots of fun and experiments with your shutter speed in manual mode. Changing shutter speed not only changes the amount of light, it also changes the way of your image look. By changing the shutter speed you are allowing the digital sensor of your camera to be exposed for a longer or shorter period of time.
Lets take a look at a few examples using slower shutter speed to show motion in your image.

The image above shows what happens when you use a slow shutter speed while holding the camera still. In this case the shutter speed of 1/40 showing some motion of the cyclist. The slower the shutter speed, the more moment in your subject.
The other example of slow shutter speed is mentioned under

So while using manual mode you can do various photography tricks and experiment new things to improve your photography.
8. Zoom Burst
8. Zoom Burst
A zoom burst or zoom blur is a fantastic photographic effect which is simple and easy to achieve. It involve zooming in or out while you take a photo, causing the shot to blur from the center outwards as if the scene is "bursting" towards you.


You don`t need any heavy equipment to get start with zoom burst all you need is a DSLR camera with a zoom lens and a tripod. Mount your camera on your tripod, choose long shutter speed so this will help you keep the blurry lines straight. Select shutter priority and choose a shutter speed of 1 to 4 seconds. Zoom full and focus on your subject. Now zoom out to to the widest angle you want to capture. Press the shutter button and zoom in until the subject fills the frame again. Try to zoom as smooth as possible, maintain the constant speed throughout and finishing just before the end of your exposure.

Mainly any subject can produce an striking zoom effect, but generally one with plenty of colors, light and pattern works best. Try photographing things like stained glass, city lights, colorful art effect etc. to produce some beautiful and colorful effects.
9. Use Tripod
9. Use Tripod

The job of the tripod is to keep your camera still, so its important to have a good stable tripod. Stability means that once you lock in your camera on the head of the tripod then your camera completely stop moving. How much your camera slides and shake after locking it in will vary with the quality of the tripod and its head. A good tripod will also be designed so its very easy and quick to set up, this is really important in nature photography, because many of these special moments don`t last too long. Before you invest a lots of money in a tripod, I`d recommend trying out a few different designs at a camera store. See what design works best for you. For example, some people like tripod legs with latches, while other prefer the leg that you can just screw lose. There are a lot of good tripods out in the market, but here are the few i can personally recommend :
- Benro T880EX
- Photron Stedy pro 560v
- Simpex 333
- Vanguard Espod CX 203AGH
- Manfrotto
- Gitzo
10. Take Images in RAW
RAW is a file format like jpeg, but unlike jpeg it capture all the image data recorded on your camera`s sensor rather than compressing it. When shoot in RAW you will not only get higher quality image but you`ll also have far more control in post processing. For instance you will be able to correct problems such as over or underexposure and adjust things like color temperature, white balance and contrast. One downside in shooting in RAW is that the file take up more space. Additionally RAW photos always need some post processing so you`ll need to invest in a good photo editing software.
Ultimately however, shooting in RAW can transform the quality of your image, so if you have time and space its definitely worth it. If you are not sure how to switch from JPEG to RAW check your camera`s manual for detailed instruction.
11. Wide Aperture is best for Portrait
Ultimately however, shooting in RAW can transform the quality of your image, so if you have time and space its definitely worth it. If you are not sure how to switch from JPEG to RAW check your camera`s manual for detailed instruction.
11. Wide Aperture is best for Portrait

When shooting portrait whether of people or animals, your subject should be the main focus of the picture and the best way to achieve this is to use a wide aperture. This will keep your subject sharp while blurring out any distractions in the background.
Keep in mind that the smaller f/ number means a wide aperture and the wider the aperture the more dramatic this effect will be. Some lens can go as low as f/1.2 but even aperture of f/5.6 can do the best. To better understand how the aperture effects your image, switch to Aperture Priority Mode (Av or A) and try taking some shots with different aperture.
12. Eyes should always be in focus

One major thing in photography is eyes, the eye are an important facial feature and they are often the first thing people look at, specially when it comes to closeup or head shots. With this in mind you subject`s eyes should be your main point of focus. To get both eyes nice and sharp, chose a single focus point and aim it at one of the eye. Once the first eye is in focus keep the shutter button pressed halfway down and move the camera slightly to recompose the photo and include the second eye.
13. Always shoot in Golden Hours

Lighting can make or break the photo, and the early morning and evening are widely thought to be the best time of the day for taking photos. In photography the hours just after the sun rise or before it sets is called the "Golden Hour" because the sun is lower in the sky and the light is softer and warmer. Whether you are shooting landscapes, portraits, or still life, using the early morning or evening light can give your photo a serene feel with its warm glow and a long shadows it casts. Of course the golden hour is not the only time you can get good outdoor photos, but it does make it easier.
14. What is White Balance
Understanding camera white balance is a cornerstone of taking good photo with a digital camera. Poor white balance means a worst, a ruined photo and at last a lots of time wasted post processing your image in an attempt to fix what you could have fixed in camera. Most digital camera have the ability to change the white balance manually,white balance is an algorithm in the camera which tries to understand the current lighting situation and judge the possible light source and then compensate to remove any possible color cast, the color temperature of a light source is measured in Kelvin (K). The color temperature over 5400K are called the warmer color (looks orange), while lower color temperature 27000K to 3500K are called the cooler color (looks blue).
Let us look at the image to understand the color cast effect due to wrong white balance :


With the Nikon D3300 set to Aperture Priority we are able to access the white balance menu from within the the camera setting menu. Here we can select one of the preset white balance option based on our current shooting conditions.
So whatever method you are using don`t forget to review the photograph in LCD monitor and probably correct the white balance right in the field.
15. Depth of Field

Depth of field is a fancy way of describing what is in focus in your photo, is your range of focus is shallow or deep. Here is a simple exercise to explain this concept. Hold your hand up in front of of your face, close one eye and now focus on the details of your hand. Do you notice that once you focus on your hand that everything in the background goes out of focus. Now leave your hand there leave one eye closed and focus on the background. Notice how your hand is out of focus, the term depth of field is simply the art of controlling how much of your photo is in focus.

15. Candid Photography

Taking photos of peoples when they have no idea that you are doing is called Candid Photography, One of the beauties of this photography is being able to catch someone in the act. It ads life to your images.
Although taking a candid shot can seems easy, i am going to give you a few steps to follow that will help you to magnify the effectiveness and quality of your image.
- Firstly you have to ensure that you have your subject in your viewing range while they are not paying attention.
- Train your eyes to capture the moment. Moving fast along with having a method for doing it is the key, you need to have your camera cued up and ready even before you find a subject to shot.
- Always keep your camera on the appropriate setting. This form of photography has a heavy reliance on light and furthermore, you may not always get to select the angle.
- Good lighting and a great angle are all the parts of getting a good shot, but being still and making observation is what`s most important.

Candid Photography is all about understanding and capture unplanned moments of someone`s emotions, either they are tears or happiness. The skill you have to develop as a photographer is the ability to take notice and observe. Photographer will look far and wide, over the crowd and through the landscape looking for that one in a million shot.
Taking Candid photos can be fun and exciting and one of the most rewarding of all photos but the downside is it can become annoying when the subject is aware of the camera.


Comments
Post a Comment